"beep... beep... beep... beep..." - Leonard Nimoy
Launching Your First Satellite
This tutorial covers the basics of launching a standalone satellite in RemoteTech. It assumes you have not yet established a comsat network, so that the only connection of interest is a direct link between the satellite and the Kerbal Space Center (KSC).
To play this tutorial, you should already know how to launch non-RemoteTech rockets, including basic rocket design, staging, and using maneuver nodes. If you are launching with solar panels, you should already know how to deploy them. By the end, you should understand:
- how to keep control of unmanned rockets from liftoff to orbit
- how to plan pre-network missions around your limited line of sight to KSC.
Requirements
You must have researched Flight Control, which unlocks the Stayputnik probe core and the Reflectron DP-10 omnidirectional antenna. Researching Electrics, which unlocks solar panels, is recommended but not required.
This tutorial does not require any mods other than RemoteTech.
Overview
To control a probe or satellite from the ground, you need a reliable communications link over which to send commands to mission control. In a mature space program, a network of commsats will help you relay transmissions in any direction, but you don’t have that luxury at the start of the game. So how do you launch and control the very satellites that are supposed to help you do the controlling?
In order to have remote control of a vessel, it must have a communications link with Kerbal Space Center. To establish this link, you require an antenna that has the range to reach it and no obstructions between them. Launching a satellite into orbit means it will, sooner or later, end up on the far side of the planet. Given the nature of orbits, this wouldn’t be too much of a problem since the satellite would come back around again, except that on that first crucial launch, you need control to circularize your orbit. Otherwise you risk launching nothing but a future fireworks display for the citizens on the far side of Kerbin.
Fortunately, getting into a stable orbit before you lose control doesn’t demand any precision computing. It’s just a matter of being careful…

Satellite Design
As for any KSP probe, you will need a probe core, a battery, and (once you have the tech) solar panels. Double-check that you have enough panel and battery capacity to cover the energy needs of your antenna(s), since RemoteTech antennas use a lot more power than the stock versions.
At low tech levels you have access to only three antennas: the Communotron 16, the Reflectron DP-10, and the Comms DTS-M1. Of these three, the Reflectron DP-10 is the only one that can work in Kerbin’s lower atmosphere without breaking off, so you must include it on the satellite (several atmosphere-safe dishes become available later in the tech tree). The other two antennas are optional for low enough orbits.
Launch
The DP-10 is unique among RemoteTech antennas in that it is automatically switched on at mission start, so you don’t need to do any fine-tuning on the pad.
Your launch trajectory is important. Were fuel efficiency your only concern, you would want a long, flat launch path to build up speed, and some mods (particularly Ferram Aerospace Research) encourage this. Unfortunately, a path like that means you won’t reach orbit until you are out of sight of Mission Control, and therefore out of contact. There are two ways to avoid this, depending on your play style: following a steep launch path or using the flight computer. A steep launch requires fewer RemoteTech-specific skills but is less efficient (and may lead to a broken rocket while playing FAR), while the flight computer gives you the freedom to build and launch your rocket how you like but requires you to pick up more advanced skills right away.
Method 1: Steep Ascent
Make sure you take care of all maneuvers before you pass out of contact. This means tuning your launch trajectory so that you finish your final burn less than 280 km (27° longitude) downrange of KSC. Some trial and error may be necessary if you’re used to shallower launches, but the traditional 45° ascent path should work.
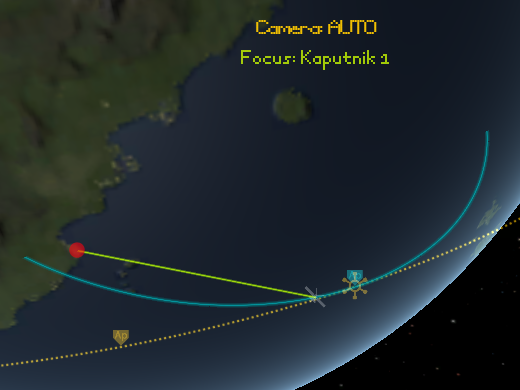
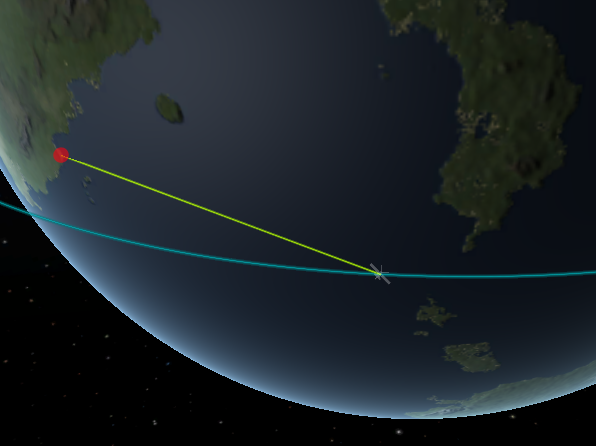
Left: A comlink-friendly ascent path. Right: The position of a satellite in an 80 km orbit just before it loses line of sight with KSC.
If you have solar panels, deploy them as soon as you are out of the atmosphere, even if it’s a night launch. That way, you won’t have to worry about running out of power while halfway around Kerbin. Communication links only work while the satellite has power, so if you fail to deploy the panels before the satellite goes out of contact, you might not be able to recover it one orbit from now.
Method 2: Flight Computer
Launch however you usually do. Once you are coasting to apoapsis, set a maneuver node to represent the final burn to reach orbit. Then, open the flight computer by clicking on the calculator icon below the mission clock, followed by “»” to open the command queue. Click “GRD+” to tell the ship to face prograde (at least, until it gets out of the atmosphere), then click “EXEC” to tell it to execute the maneuver node.
If you have solar panels, you need to make sure they get deployed once out of the atmosphere, or your satellite may run out of power before its next pass over KSC. Type “1m” (for “one minute”, or whatever delay you think you need to be clear of that pesky air) in the lower right text box, then press enter. Check that the “Delay (+ signal)” display reads one minute.
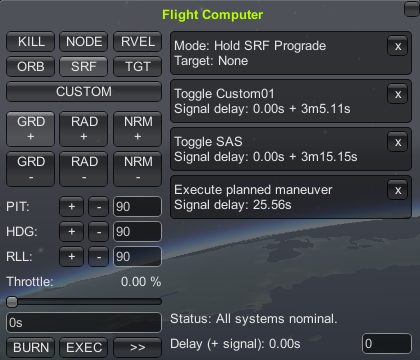
Then open each panel by right-clicking or using an action group, as in normal KSP. It’s ok if you do this while still in the atmosphere. Rather than opening instantly, the solar panels will appear in the queue, scheduled to open after the delay. Once the solar panel command(s) are in the queue, type “0” followed by enter to reset the delay (otherwise ALL your commands will have a delay). Check that the “Delay (+ signal)” display shows no delay.
The final queue should look something like this picture (the “Toggle SAS” command is optional).
The End
That’s it! You now have a basic satellite in orbit around Kerbin. Every time it passes over KSC, you can send or schedule more commands. Or you can just leave it where it is, happily beeping away.
Optional Steps
High-Powered Antennas
The DP-10’s main disadvantage is its 500 km range. If your satellite will never go above 150 km, this is more than adequate – any time you have a line of sight to Mission Control, you will be in range. For ever-higher orbits, you will only be in range in an ever-narrower circle centered on Mission Control.
For missions to high orbits (or just for practice before you send up a full-fledged comsat), you may wish to include one of the other antennas in your design. If you have another antenna, you can move the DP-10 from the satellite to the launcher’s upper stage, so you can discard it once it’s served its purpose.
If you have the Comms DTS-M1, right-click on it while on the launchpad, then click the button marked “No Target”. In the window that opens, select “Mission Control” to make it the antenna’s target. Do not activate the antenna yet, or it will break off as your rocket builds up speed. Setting the target now will give you one less thing to worry about in the hectic minute before orbital insertion.
If you have an antenna other than the DP-10, you will need to activate it in flight. You can do this either by right-clicking on the antenna and clicking “activate”, or by binding it to an action group in the VAB. All RemoteTech antennas are safe to use above 35 km, so you should be able to deploy the antenna while still in line of sight to KSC. An alternate strategy is to bind the antenna to an action group together with the satellite’s solar panels, and trigger the group to deploy everything once you leave the atmosphere.
Post-Burn Attitude Control
If you are using the flight computer to get into orbit, the computer will turn off attitude control at the end of the burn, which will leave the satellite slowly tumbling. If you like, you can add a command to maintain attitude after the burn.
Type a delay that corresponds to just after the orbit insertion is finished (any attitude commands sent during the burn will be ignored). Then pick the attitude command of your choice: press the SAS key, or click “KILL” to kill rotation, or click “GRD+” to hold prograde (if you already have an active GRD+ command, you may have to click twice, then cancel the command labeled “mode: off”). Don’t forget to reset the delay to 0 when you’re done!