"beep... beep... beep... beep..." - Leonard Nimoy
Creating a Keosynchronous Satellite Network
This tutorial covers how to launch three or four equally spaced satellites into keosynchronous equatorial orbit (KEO). It assumes you have no pre-existing satellite network. This network is recommended for players interested in role-playing or in a challenge. Since, in RemoteTech, dishes can be pointed and signals rerouted instantaneously, there is no in-game advantage to keeping communications satellites stationary, and a lower orbit is both easier to achieve and better for interplanetary communications.
To play this tutorial, you should know how to design rockets to specific performance (i.e., delta-V) requirements, how to change orbits, and how to launch satellites in RemoteTech. By the end, you should understand:
- how to use the first satellite in a network to coordinate placement of the others
- how to place satellites a predetermined distance apart along an orbit
- how to use the flight computer to execute burns in network blind spots
The tutorial gives two methods for creating a KEO network. Separate launches have an easier rocket design and less specific orbit requirements, but are more tedious and familiarity with KSP’s rendezvous-planning system. A single launch is faster, but requires skill in both rocket design and orbital maneuvers. Many thanks to Elan for the idea!
Overview
One of the first steps in playing with RemoteTech is creating a network of communications satellites. While you can carry out low-orbit missions without any infrastructure, as you get farther and farther from Kerbin it will become increasingly difficult to get a direct connection to Mission Control. A well-designed network is one that lets you communicate from anywhere you want to go (which, in the early game, will be Kerbin’s sphere of influence) and that doesn’t require a lot of fine-tuning once you’ve set it up.
While more difficult to set up than an omni-based network, a keosynchronous equatorial orbit (KEO) requires less precise satellite positioning, because its longer orbital period means satellites take longer to drift out of formation. It won’t be hands-free until you have access to the Communotron 32, which can reach keostationary altitudes from low kerbin orbit, so it might be more appropriate for sandbox or late career games. However, once you do have the Communotron 32 on your vessels, the keosynchronous orbit gives you automatic coverage in a larger region of space than a low-altitude network.
But perhaps the best reason to build a keosynchronous network is because, as of Kerbal Space Program 0.24, you can get paid for launching synchronous satellites.
Requirements
For technology requirements, see the General Satellite Design tutorial.
This tutorial assumes you have at least one mod that gives you orbital periods in-game. In order of decreasing precision, the best choices are Vessel Orbital Information Display, Kerbal Engineer Redux, and MechJeb. The screenshots all use Kerbal Engineer, since that’s the mod I’m most familiar with.
Satellite Design
In terms of the payload guidelines from the General Satellite Design tutorial, we need antennas for communication with the surface and with each satellite’s siblings.
- Communicating with Kerbin’s surface and low Kerbin orbit
- KEO is located 2869 km above the surface, or 3469 km from Kerbin’s center. The farthest point on Kerbin’s surface from any satellite will be 3420 km away, near the poles. Therefore, the best antennas for this role are the Communotron 32 or the Comms DTS-M1.
- Communicating with siblings
- KEO satellites in an equilateral triangle formation will be located 6008 km apart, requiring the use of the Comms DTS-M1 to maintain contact. KEO satellites in a square formation will be only 4906 km apart, allowing the Communotron 32 to fill this role.
You may also want to add additional antennas for communicating with specific planets or with specific relay satellites.
In keosynchronous orbit, a satellite will experience up to 1200 seconds of darkness. Make sure you have enough battery power!
Ensure your satellite has an option for making very low-thrust burns (either RCS or a light engine).
Method 1: Separate Launches
This method requires a rocket with at least 5615 m/s of delta-V to both reach and circularize at keostationary altitudes.
First Satellite
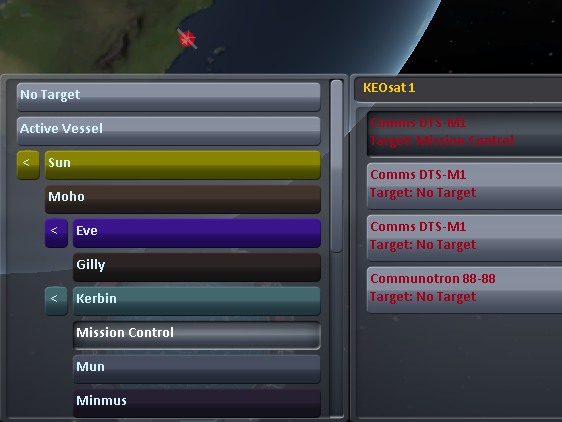
Begin by launching your satellite into low Kerbin orbit. If you are using the Comms DTS-M1 as your Kerbin communication antenna, target it at Mission Control (not Kerbin) to maintain contact whenever your satellite is above the horizon.
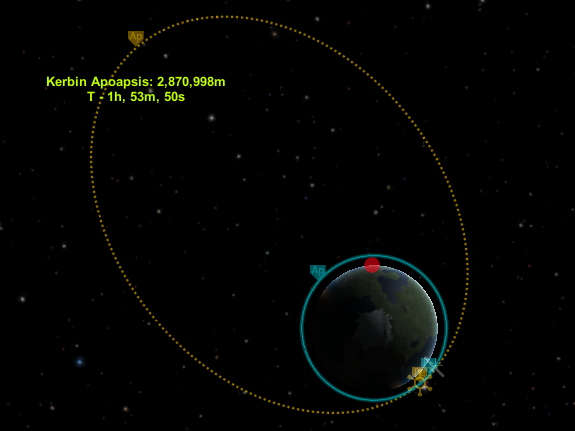
You now need to schedule a maneuver node for the KEO transfer orbit. You want to set your apoapsis at about 2870 km (it doesn’t have to be exact), and schedule the maneuver node so that you reach apoapsis while the satellite has a line of sight to the Kerbal Space Center (KSC). The transfer (from an 80 km starting orbit) will take 1 hour 23 minutes, so you want to account for Kerbin (and KSC) rotating by 83° in the time it takes you to reach apoapsis. The best position for your first satellite is 60° away from KSC’s longitude (for a 3-satellite network) or 45° away from KSC (for a 4-satellite network), so that two satellites can contact KSC directly. So the best place to put the maneuver node is:
| Network Size | 1st Satellite East of KSC | 1st Satellite West of KSC |
|---|---|---|
| 3 satellites | 23° before KSC | 143° before KSC |
| 4 satellites | 38° before KSC | 128° before KSC |
Again, placement doesn’t have to be exact. As long as you’re within about 20° or so, the worst that will happen is that your network will look a little lopsided. The screenshot below shows the 143° offset needed to get a satellite 60° west of KSC.
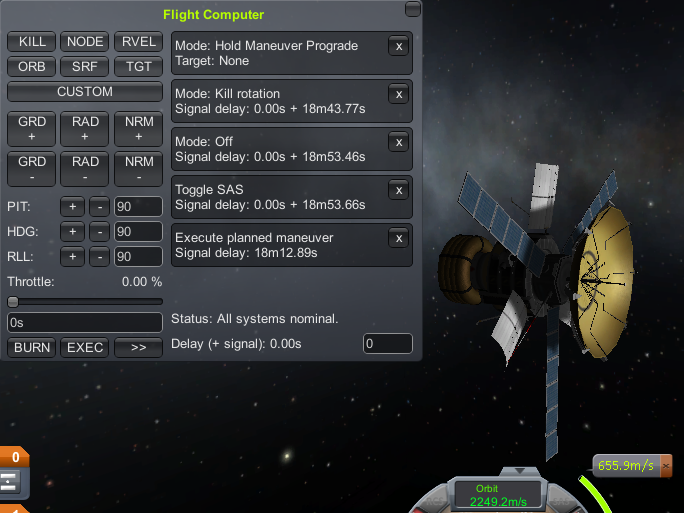
If you don’t have a pre-existing satellite network, three of the four possible burns will be out of contact with KSC. Once you’re satisfied with your maneuver node, open the flight computer by clicking on the green calculator icon below the mission clock (if it’s not green, you will have to wait until you next fly over KSC). Click “NODE” at the top of the window, then “EXEC” at the bottom. This will tell the computer to prepare for and execute the burn when the time comes. You can optionally schedule post-burn attitude controls using manual delay, as done in the screenshot above. Once the satellite comes back over the horizon after the burn, you’ll be able to control it directly again.
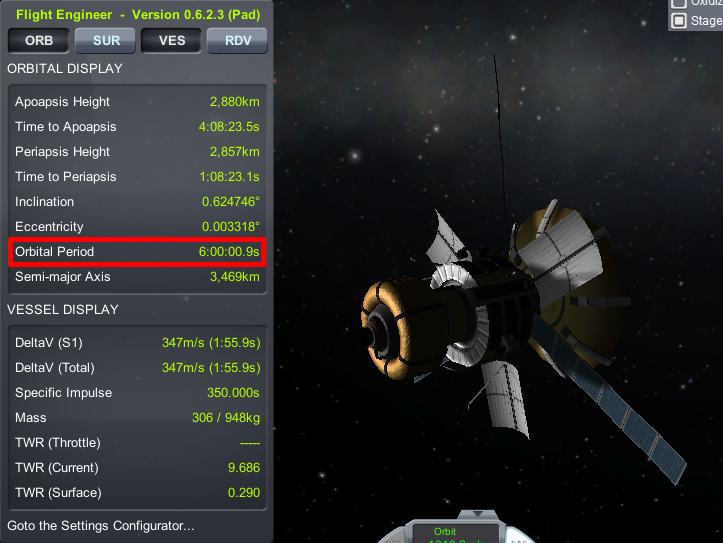
Once you are approaching apoapsis (and are in contact with KSC, thanks to your careful maneuver timing), circularize your orbit as usual. Your goal is to set your period as close to 6 Earth hours (1 Kerbin day) as you can . It does not matter if your orbit is perfectly circular; it does not matter if your orbit is perfectly uninclined. The orbital period is what makes a keosynchronous orbit work. Write down your exact final period for later use.
Once you’ve achieved your final orbit, you’re done. If you’re using a dish antenna to contact the KSC, switch its target to Kerbin to use cone mode. This will let the remaining satellites in the network benefit from your first satellite’s superior coverage.
Remaining Satellites
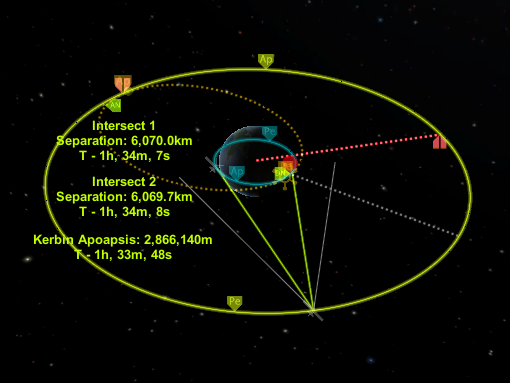
Fortunately, the first satellite was the hardest, because now you can use Kerbal Space Program’s built-in tools to place your remaining satellites. Launch each satellite into low Kerbin orbit as before. While in low orbit, make sure your new satellite has a dish pointed at the previous satellite in the network, and vice versa. This will let you keep in touch with your new satellite for a much larger portion of its orbit than if it relied on a direct line to KSC.
Use the map view to select the previous satellite in the network as the target. Set a maneuver node that reaches an apoapsis of 2870 km; a rendezvous marker should appear, telling you how far your satellite will be from the target at apoapsis. Adjust the maneuver node’s position until this distance is close to 6008 km (for a 3-satellite network) or 4906 km (for a 4-satellite network). If the maneuver node is in one of your network’s blind spots, use the flight computer to handle the burn.
Once your satellite reaches apoapsis, circularize your orbit. This time, your goal is to get exactly the same period as your first satellite (to within high tolerances). It is more important that your satellites stay in formation with each other than that they stay synchronized with Kerbin’s rotation. RCS can help with this, as can right-clicking on your engine and setting the throttle limiter to a very low value.
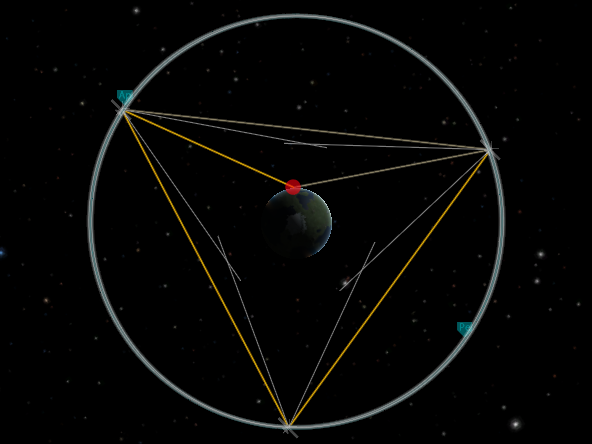
Once you are happy with your orbit, double-check that all dishes have the targets they need to, and that all previously launched satellites that need to target your new satellite have done so. You’re done!
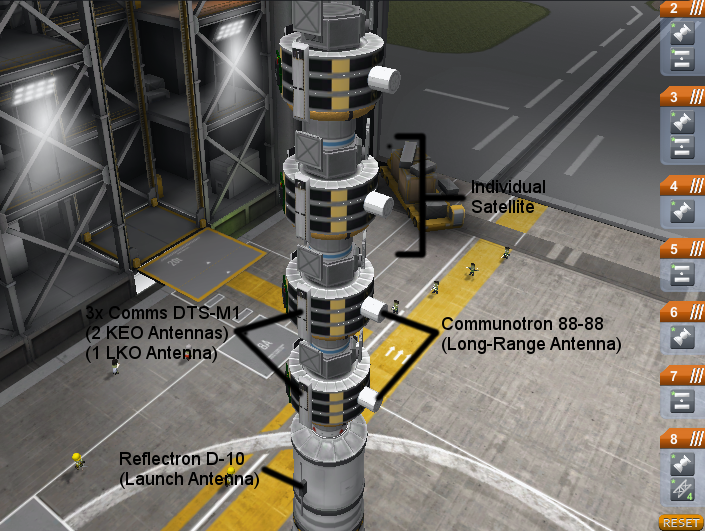
Method 2: Single Launcher
For this method, you want to stack all your satellites on top of your rocket, with a stack separator (NOT a decoupler, unless you want it permanently attached to one of your satellites) between each. Configure your staging so that the satellites are released from top to bottom.
Use a rocket with at least 5400 m/s of delta-V, not including any fuel in the satellites, for reaching a transfer orbit. Make sure each satellite has at least 435 m/s for circularizing into keosynchronous equatorial orbit (KEO).
Transfer orbit 1
Begin by launching into an elliptical orbit with an apoapsis of 2870 km (it doesn’t have to be exact). If you are using the Comms DTS-M1 as your Kerbin communication antenna, target an antenna on each of the satellites at Mission Control (not Kerbin) to maintain contact whenever your satellite is above the horizon. Setting up the antennas while coasting upward means less chances for a costly mistake when you start detaching satellites.
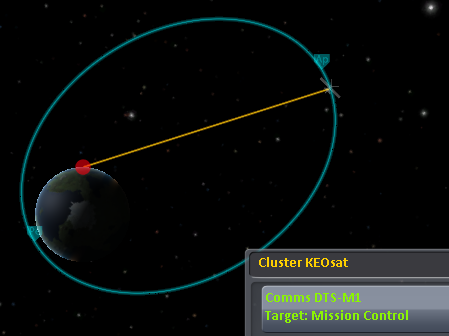
Wait until the rocket approaches apoapsis while in line of sight from KSC. A position directly over KSC will make for a less robust network; a good position would be 40-80° away (for a 3-satellite network) or 10-80° away (for a 4-satellite network), because these positions give two satellites in the network direct lines of sight to KSC.
Once you are approaching apoapsis, double check that your first satellite and your rocket can maintain contact with KSC independently, then release the satellite and switch to it.
Once your satellite reaches apoapsis, circularize its orbit using its built-in engine. Your goal is to set your period as close to 6 Earth hours (1 Kerbin day) as you can. It does not matter if your orbit is perfectly circular; it does not matter if your orbit is perfectly uninclined. The orbital period is what makes a keosynchronous orbit work. Write down your exact final period for later use.
Once you’ve achieved your final orbit, all that’s left is setting up the antennas. If you’re using a dish antenna to contact the KSC, switch its target to Kerbin. This will let the rocket and the remaining satellites benefit from your first satellite’s superior coverage. Also point one of your dishes to the launch rocket, since it includes the next satellite in the chain.
Transfer orbit 2
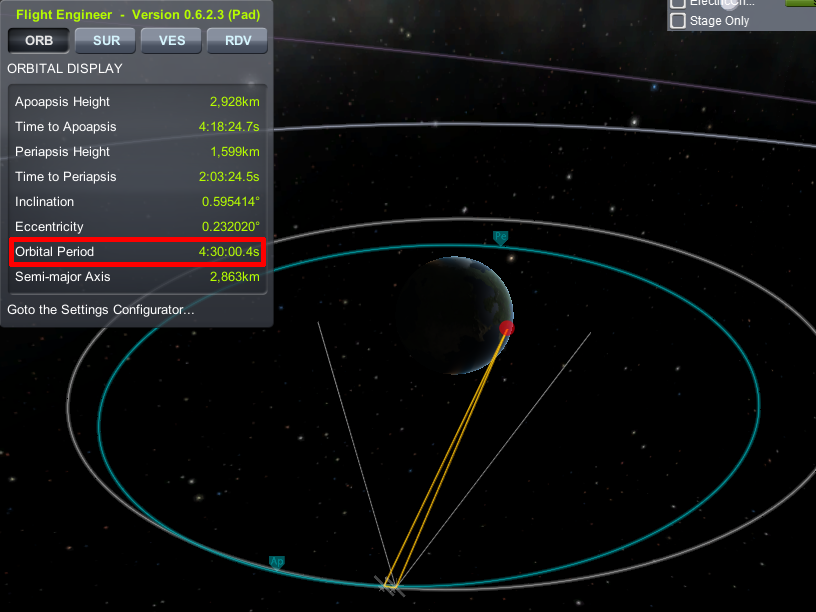
Switch back to the rocket, which should still be close to apoapsis, and burn prograde until the orbital period rises to 4 hours (for a 3-satellite network; 1225 km periapsis) or 4.5 hours (for a 4-satellite network; 1658 km periapsis). Up to a minute of error won’t matter, since you only need to worry about the drift over 3-4 orbits.
Deployment
The rocket’s orbital period is set so that it will next return to apoapsis 120° (for a 3-satellite network) or 90° (for a 4-satellite network) behind the satellite you just launched. Every time the rocket approaches apoapsis, release another satellite. If you are using dishes rather than the Communotron 32 to set up connections between keostationary satellites, you need to take care with the dish targets, especially if you have not yet researched Unmanned Tech (which unlocks a 3 km omni antenna for all probe cores).
Before releasing the satellite:
- Both the rocket and the satellite should have a dish pointed at the previous satellite to be released.
- The previous satellite should have a dish pointed at the rocket.
Immediately after releasing the satellite:
- The rocket should point a dish at the satellite that was just released. The dish that was pointing at the previous satellite may be used, although this may temporarily break the rocket’s connection to Mission Control.
- The previous satellite should retarget the dish that was pointing at the rocket to the satellite that was just released.
- The satellite just released should point an unused dish at the rocket.
- The satellite should retarget its Mission Control dish to point to Kerbin.
This sequence of steps will ensure that each satellite has a two-way link to the satellite just before it, and that the rocket always has a two-way link to the last satellite in the chain.
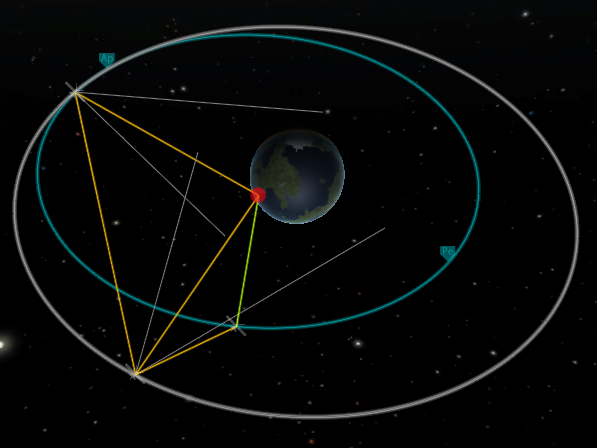
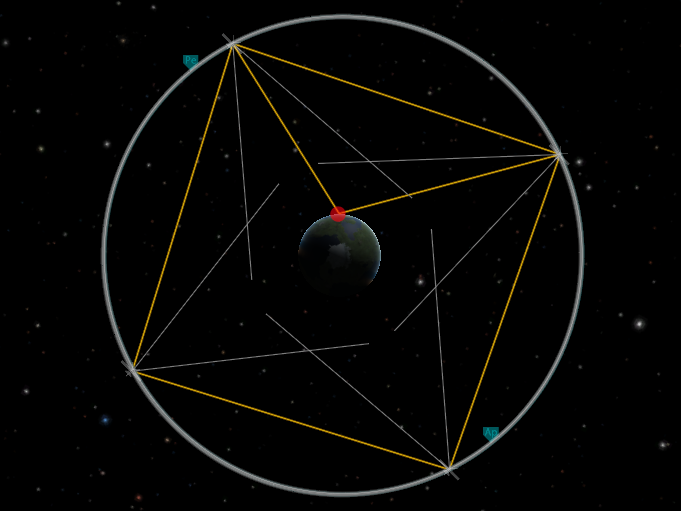
Circularize the satellite’s orbit at apoapsis. This time, your goal is to get exactly the same period as your first satellite (to within high tolerances). It is more important that your satellites stay in formation with each other than that they stay synchronized with Kerbin’s rotation. RCS can help with this, as can right-clicking on your main engine and setting the throttle limiter to a very low value.
Once you release the second-to-last satellite, the rocket and the final satellite will be essentially the same thing. Have the first satellite in the sequence and the rocket/final satellite point dishes at each other, completing a ring of connections.
Appendix: Orbit Tolerances
The precision with which you need to match the periods of your KEO satellites depends on how much drift between satellites you’re willing to tolerate:
| Period Error | Drift Rate | Time to drift 20° |
|---|---|---|
| 0.01 seconds | 0.00017° per orbit | 82.2 Earth years (282 Kerbin years) |
| 0.1 seconds | 0.0017° per orbit | 8.2 Earth years (28.2 Kerbin years) |
| 1 seconds | 0.017° per orbit | 300 Earth days (2 Kerbin years 347 days) |
| 5 seconds | 0.083° per orbit | 60 Earth days (240 Kerbin days) |
Optional Steps
Save File Tweaking
It is nearly impossible to give two satellites exactly the same orbital period, because the period will change whenever the satellite rotates (for example, to keep facing the sun over the course of the year). For the last word in satellite synchronization, you may wish to edit your save file. Some RemoteTech players see this as essential to get around game engine limitations, others see it as cheating. You will have to decide for yourself.
WARNING: editing the save file may corrupt the save if you are not careful. Make a copy of your save game before proceeding.
Once you’ve synced up your satellites in-game as best you can, exit the game and open saves/<Your Game Name>/persistent.sfs in any text editor. Search for the name of your first satellite, ignoring any debris entries, then find a block a few lines down that looks like this:
ORBIT
{
    SMA = 3468749.92670803
    ECC = 0.00031529434862492
    INC = 0.314137942694019
    LPE = 341.433303970299
    LAN = 42.6228520343802
    MNA = 3.88805040897349
    EPH = 8196339.4103384
    REF = 1
}
Copy the SMA value, and only the SMA value, to the similar blocks you will find in the entries for the other satellites. Your satellites will now have exactly the same orbital period.