"beep... beep... beep... beep..." - Leonard Nimoy
Creating an Omni-Only Network
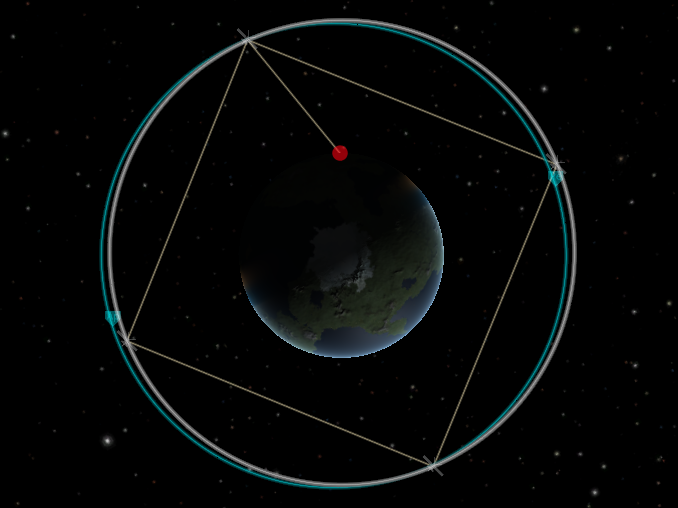
This tutorial covers how to create a four-satellite network* using no antenna more powerful than the Communotron 16. Players who have access to more powerful antennas can feel free to include them in their satellite design, while leaving the Communotron 16 as the backbone of the constellation.
*While it’s possible to make a 3-satellite network with a few changes to these instructions, the orbit and synchronization requirements are too strict for it to be worth the trouble.
To play this tutorial, you should know how to design rockets to specific performance (i.e., delta-V) requirements, how to change orbits, how to carry out a rendezvous using the map view, and how to launch satellites in RemoteTech. By the end, you should understand:
- how to use the first satellite in a network to coordinate placement of the others
- how to place satellites a predetermined distance apart along an orbit
- how to use the flight computer to execute burns in network blind spots
Overview
One of the first steps in playing with RemoteTech is creating a network of communications satellites. While you can carry out low-orbit missions without any infrastructure, as you get farther and farther from Kerbin it will become increasingly difficult to get a direct connection to Mission Control. A well-designed network is one that lets you communicate from anywhere you want to go (which, in the early game, will be Kerbin’s sphere of influence) and that doesn’t require a lot of fine-tuning once you’ve set it up.
Fortunately, you can build such a network with no more equipment than a Stayputnik probe core, an OX-STAT solar panel, and a Communotron 16 (well, and maybe some rockets and such).
Requirements
For technology requirements, see the General Satellite Design tutorial.
This tutorial assumes you have at least one mod that gives you orbital periods in-game. In order of decreasing precision, the best choices are Vessel Orbital Information Display, Kerbal Engineer Redux, and MechJeb. The screenshots all use Kerbal Engineer, since that’s the mod I’m most familiar with.
Orbit Selection
The requirement that the satellites be connected by Communotron 16’s forces the altitude of the satellites to be at least 250 km (below which the satellites are below each others’ horizons) and at most 1160 km (above which the satellites are out of range of each other). You want to avoid placing satellites close to either edge of this range, however, because then your network will be very vulerable to drift. If you have four satellites at 250 km, for example, then as soon as any two satellites get only slightly farther apart, the horizon will break the connection between them.
The exact altitude doesn’t really matter as long as you’re somewhere near the middle. We’ll go with an altitude of 776.6 km, which in addition to being far from either end of the altitude range has a convenient orbital period of 1.5 hours. Picking a round number for the period will make synchronizing the satellites much easier.
Satellite Design
In terms of the payload guidelines from the General Satellite Design tutorial, we will be using the Communotron 16 for local communication, communication with the surface, and communication with siblings. The result will be a network that provides excellent, automatic coverage in low Kerbin orbit, but doesn’t support long-range missions. You can add one or more dishes to the design if you want to contact, say, the Mun.
In each 1.5-hour orbit, a satellite will experience up to 775 seconds of darkness. Make sure you have enough battery power!
To get to a 780 km orbit, use a rocket with at least 5170 m/s of delta-V. Ensure your satellite has an option for making very low-thrust burns (either RCS or a light engine).
 1.5 hour orbit")
Mission Plan
First Satellite
Begin by getting your satellite into an orbit with an apoapsis of 777 km, then wait until it approaches apoapsis while over the Kerbal Space Center. This should not take more than a few orbits.
Once you have line of sight, circularize your orbit at apoapsis. Your goal is to set your period as close to 1 hour 30 minutes as you can. As long as they’re reasonably low, your eccentricity and inclination don’t matter. The period, however, does matter: write down the exact value for later use.
Second and Third Satellites

The second and third satellites are the hardest, because you need to synchronize them both with your previous satellite(s) and with Kerbin’s rotation. Launch each satellite into low Kerbin orbit. Use the map view to select the previous satellite in the network as the target. Set a maneuver node that reaches an apoapsis of 777 km; a rendezvous marker should appear, telling you how far your satellite will be from the target at apoapsis. Adjust the maneuver node’s position until this distance is close to 1947 km. It doesn’t have to be exact.
You also need to make sure that either the marker representing your targeted satellite or the marker representing your current satellite will be over KSC, after allowing for Kerbin to rotate by roughly one sixth of a rotation – otherwise, you may be out of contact during the circularization burn. If necessary, delay the maneuver node by one orbit by right-clicking on it, clicking on the blue button to the lower right, then right-clicking again. After advancing by one orbit, you will have to fine-tune the separation between the satellites again.
If the maneuver node happens when you are out of contact with KSC, you will have to use the flight computer to handle the burn. Open the flight computer by clicking on the green calculator icon below the mission clock (if it’s not green, you will have to wait until the next time you have a connection). Click “NODE” at the top of the window, then “EXEC” at the bottom. This will tell the computer to prepare for and execute the burn when the time comes. Once the satellite comes back over the horizon after the burn, you’ll be able to control it directly again.
Once your satellite reaches apoapsis, circularize your orbit. This time, your goal is to get exactly the same period as your first satellite (to within high tolerances). RCS can help with this, as can right-clicking on your engine and setting the throttle limiter to a very low value.
Fourth Satellite
The fourth satellite is similar to the second and third, except you don’t have to worry about synchronizing with KSC’s rotation. If you set up the maneuver to reach apoapsis 1947 km from the previous satellite, then you are guaranteed to have a working connection when you make the circularization burn.
Appendix: Orbit Tolerances
The precision with which you need to match the periods of your KEO satellites depends on how much drift between satellites you’re willing to tolerate:
| Period Error | Drift Rate | Time to drift out of contact (38°) |
|---|---|---|
| 0.01 seconds | 0.00067° per orbit | 10 Earth years (33 Kerbin years) |
| 0.1 seconds | 0.0067° per orbit | 360 Earth days (3 Kerbin years) |
| 1 seconds | 0.067° per orbit | 36 Earth days (140 Kerbin days) |
Optional Steps
Save File Tweaking
It is nearly impossible to give two satellites exactly the same orbital period, because the period will change whenever the satellite rotates (for example, to keep facing the sun over the course of the year). For the last word in satellite synchronization, you may wish to edit your save file. Some RemoteTech players see this as essential to get around game engine limitations, others see it as cheating. You will have to decide for yourself.
WARNING: editing the save file may corrupt the save if you are not careful. Make a copy of your save game before proceeding.
Once you’ve synced up your satellites in-game as best you can, exit the game and open saves/<Your Game Name>/persistent.sfs in any text editor. Search for the name of your first satellite, ignoring any debris entries, then find a block a few lines down that looks like this:
ORBIT
{
    SMA = 1376599.67497195
    ECC = 0.00389366036050499
    INC = 0.233585703096135
    LPE = 43.7188835604928
    LAN = 344.168722710595
    MNA = 5.59207455474008
    EPH = 15705.4855810846
    REF = 1
}
Copy the SMA value, and only the SMA value, to the similar blocks you will find in the entries for the other satellites. Your satellites will now have exactly the same orbital period.